This is a quick guide for those out there who have a later edition of the Big Silver Mac Pro (not the little super fast Black Mac Pro Apple unveiled, Summer of 2013).
I decided I wanted to have Wifi in my Mac Pro as its position in the building meant it would be cheaper to add an airport extreme card than to add an additonal phone socket and the wifi speeds are good enough now.
I tried following a popular walkthrough online but it is for the older Mac Pro models. There’s still a lot of useful information in here but the position of the airport extreme wires and attachments are different for the later Mac Pro models.
It’s worth noting before we start that this used to (and possibly still is) a procedure that Apple don’t recommend as a user job, instead you should take your MacPro in to a store and pay a fitting fee plus the parts for them to do it. Though I’m not sure if they even sell the part anymore. I found my version on ebay and works perfectly so far though I give no guarantee or take any liability if you decide to follow out the installation process yourselves.
Step 1.
Unplug your mac, make sure you have the airport extreme card, 2 x tiny screws and the suitable electronic screw driver (make sure its magnetic to avoid losing the screws inside the machine).
Step 2.
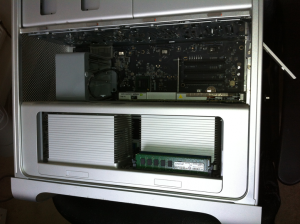
Pull the hand on the back of your Mac Pro to release the side panel now you can lay it on its side. The inside of your Mac Pro (if the correct model) should look similar to the image below.
Step 3.
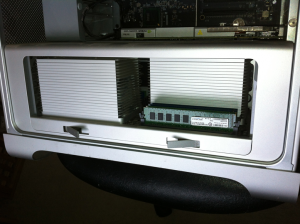
On the lower section, press in the two tab buttons and pull out the tray.
Step 4.
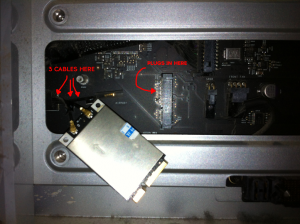
Behind the tray you will find the location for fitting the Airport extreme card plus 3 wires labelled up 1,2 and 3.
Again people report different success with the order of the numbers (I suspect due to be labelled incorrectly in the factory), when correct you will have full 802.11n wireless signal. Connecting the wifi connectors is very fiddly, I found it ok and after a little perseverance the little blighters click in. It seemed to work best if I positioned a connector over its little socket and push and twist the end connector slightly around as I did it… either way you’ll find a way. There are two numbers on the Airport extreme card connectors, 0 and 1.
I put the cable 3 on socket 0, and cable 1 on socket 1. (Cable 3 can be left with its plastic cover on.)
Step 5.
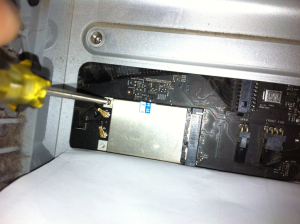
Now push the airport extreme card into the motherboard using the available plug in point (as highighted in the above image). Then screw in the two tiny screws.
Step 6.
Slide the tray with the ram back into the mac, press the tabbed buttons to fully secure, return the Mac Pro’s side panel and close the handle fully. Plugin and boot up your Mac Pro. Once booted if all has been done correctly you should see the wifi signal in the top right of your OsX screen. Mine was greyed out and I had to go to Network preferences and tell it to find my wifi network.
Step 7.
If it is working but the wifi connection is very weak try changing the order of the wires, it may well be they were numbered incorrectly when the mac was put together. Another site someone gets their best results using cables 2 and 3.
In total the job can be done in 30 to 45 minutes. I was doing it slowly and patiently so as not to get annoyed or break anything.
Good luck, I hope this little walk through is helpful to someone using a similar Mac Pro.


